8.1 Reading Request Parameter
Values
The HTML specification defines a set of elements
for presenting a form with fields in which the user can enter
text or select among predefined choices. I'm sure you have
encountered these countless times -- to tell a vendor about
yourself when downloading demo software, to specify what
you're looking for on a search engine site, or to select the
toppings when you order a pizza online. But you may not be
familiar with what's going on behind the scene when you fill
out the form and click Submit.
Example
8-1 shows an HTML page that contains the most commonly
used HTML form elements.
Example 8-1. HTML form
elements <html>
<head>
<title>User Info Entry Form</title>
</head>
<body bgcolor="white">
<form action="process.jsp" method="post">
<table>
<tr>
<td>Name:</td>
<td>
<input type="text" name="userName">
</td>
</tr>
<tr>
<td>Birth Date:</td>
<td>
<input type="text" name="birthDate">
</td>
<td>(Use format yyyy-mm-dd)</td>
</tr>
<tr>
<td>Email Address:</td>
<td>
<input type="text" name="emailAddr">
</td>
<td>(Use format name@company.com)</td>
</tr>
<tr>
<td>Gender:</td>
<td>
<input type="radio" name="gender" value="m" checked>Male<br>
<input type="radio" name="gender" value="f">Female
</td>
</tr>
<tr>
<td>Lucky number:</td>
<td>
<input type="text" name="luckyNumber">
</td>
<td>(A number between 1 and 100)</td>
</tr>
<tr>
<td>Favorite Foods:</td>
<td>
<input type="checkbox" name="food" value="z">Pizza<br>
<input type="checkbox" name="food" value="p">Pasta<br>
<input type="checkbox" name="food" value="c">Chinese
</td>
</tr>
<tr>
<td colspan=2>
<input type="submit" value="Send Data">
</td>
</tr>
</table>
</form>
</body>
</html>
This form could be the frontend to a
newsletter subscription site, for instance. In order to send
the users information that might interest them, it asks for
the birth date, gender, lucky number, and food preferences,
along with the full name and email address, for each person
that signs up for the service.
The HTML <form> element encloses all the other form
elements. Its action attribute contains the URI for
the web server resource (for instance, a JSP page, as in this
example) that the form should be submitted to. The method
attribute tells the browser which HTTP method to use when
submitting the form. Recall from Chapter
2 that the GET method is intended for requests
that just retrieve information, while the POST method
is intended for requests that cause irreversible actions, such
as saving the form values in a database.
The form in Example
8-1 contains a number of HTML <input> elements. Each
element has a
type attribute. The type attribute tells the browser
which type of input control to render: text,
password, checkbox, radio,
hidden, file, submit,
reset, image, or button. In this
example I use only text (a regular text input field),
radio (a radio button, typically used for mutually
exclusive choices), checkbox (for multiple optional
choices), and submit (a button for submitting the
form). Some of the other types are used in other examples in
this book, but if you need more detailed descriptions you may
want read a book specifically about HTML, such HTML Pocket Reference by Jennifer
Niederst (O'Reilly) or HTML &
XHTML: The Definitive Guide by Chuck Musciano and Bill
Kennedy (O'Reilly).
When the user clicks the Submit button,
the browser sends a request to the web-server resource
specified by the <form> element's
action attribute, using the method specified by the
method attribute. All values the user has entered in
the text fields and chosen from radio buttons, checkboxes, or
select lists, are sent as HTTP request parameters with the request. How
the request parameters are sent depends on the request method.
For a GET request, the parameters are sent as a query
string appended to the URL; for a POST request, they
are sent in the request body. No matter how they are sent,
each parameter is represented by a name/value pair. The name
is the name assigned to the form element using the
name attribute, and the value is either the value
entered by the user (for text fields) or the value specified
by the element's value attribute. Hence, when the
form in Example
8-1 is submitted, the request contains parameters named
userName, birthDate, emailAddr, and
luckyNumber containing the text entered by the user
(or an empty string if no text was entered) and one parameter
named gender with the value m or f
depending on which radio button the user selected.
The checkbox controls at the end of Example
8-1 have a slightly more complex behavior. Note that all
checkbox <input> elements have the same name:
food. This is how you tell that they belong to the
same category. If the user checks off more than one checkbox,
the browser sends a request with multiple request parameters
named food; one for each value. If the user doesn't
check off any checkbox (someone on a diet, maybe, or with a
more eclectic taste than I), the browser doesn't send a
food parameter at all. The HTML
<select> element (not shown in this example)
works the same way when specified to allow multiple choices.
Now when you've seen how the browser deals
with form fields, let's move on to how to access the form data
in a JSP page using either JSTL actions or a bean.
8.1.1 Accessing Parameter Values
with JSTL Actions
Example
8-2 shows a page with the same form
as in Example
8-1 but with the form's action attribute pointing back to
the JSP page that contains it and JSTL actions adding the
submitted values to the response.
Example 8-2. Accessing
parameters with JSTL (input_jstl.jsp) <%@ page contentType="text/html" %>
<%@ taglib prefix="c" uri="http://java.sun.com/jstl/core" %>
<html>
<head>
<title>User Info Entry Form</title>
</head>
<body bgcolor="white">
<form action="input_jstl.jsp" method="post">
<table>
<tr>
<td>Name:</td>
<td>
<input type="text" name="userName">
</td>
</tr>
<tr>
<td>Birth Date:</td>
<td>
<input type="text" name="birthDate">
</td>
<td>(Use format yyyy-mm-dd)</td>
</tr>
<tr>
<td>Email Address:</td>
<td>
<input type="text" name="emailAddr">
</td>
<td>(Use format name@company.com)</td>
</tr>
<tr>
<td>Gender:</td>
<td>
<input type="radio" name="gender" value="m" checked>Male<br>
<input type="radio" name="gender" value="f">Female
</td>
</tr>
<tr>
<td>Lucky number:</td>
<td>
<input type="text" name="luckyNumber">
</td>
<td>(A number between 1 and 100)</td>
</tr>
<tr>
<td>Favorite Foods:</td>
<td>
<input type="checkbox" name="food" value="z">Pizza<br>
<input type="checkbox" name="food" value="p">Pasta<br>
<input type="checkbox" name="food" value="c">Chinese
</td>
</tr>
<tr>
<td colspan=2>
<input type="submit" value="Send Data">
</td>
</tr>
</table>
</form>
You entered:<br>
Name: <c:out value="${param.userName}" /><br>
Birth Date: <c:out value="${param.birthDate}" /><br>
Email Address: <c:out value="${param.emailAddr}" /><br>
Gender: <c:out value="${param.gender}" /><br>
Lucky Number: <c:out value="${param.luckyNumber}" /><br>
Favorite Food:
<c:forEach items="${paramValues.food}" var="current">
<c:out value="${current}" />
</c:forEach>
</body>
</html>
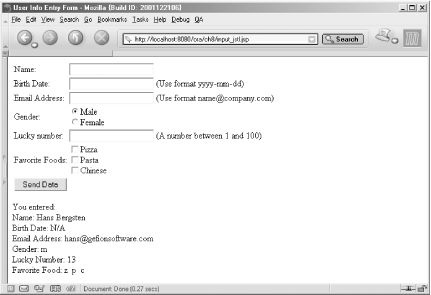
If you load the page in a browser, fill out
the form and submit it, you end up with a result that looks
something like Figure
8-1.
Let's look at how the submitted values end up in
the response. All form field values except the Favorite Foods
checkbox values, are added using a JSTL
<c:out> action (Table
8-1) with an EL expression that retrieves the request parameter value, for
instance: Name: <c:out value="${param.userName}" /><br>
Recall from Chapter
7 that param is an implicit EL variable that represents a collection
(a java.util.Map) of all request parameters sent to
the page. To get the value of a specific variable, you simply
specify the name of the parameter, separated from the
collection name with a dot.
Table 8-1. Attributes for JSTL
<c:out>
value |
Any type |
Yes |
Mandatory. The value to add to the
response. |
escapeXml |
boolean |
Yes |
Optional. true if special
characters in the value should be converted to character
entity codes. Default is true. |
default |
Any type |
Yes |
Optional. The value to use if the value
attribute is null. Can also be defined by the
body. |
As described earlier, when a user checks off
multiple checkboxes that share the same name, the request
contains multiple parameters with the same name. If none is
checked, the request doesn't contain the corresponding
parameter at all. To display the choices the user made, we
need to get all parameter values and a way to deal with them
one at a time. The implicit paramValues variable and
the JSTL <c:forEach> (Table
8-2) action satisfy these requirements.
Table 8-2. Attributes for JSTL
<c:forEach>
items |
java.util.Collection,
java.util.Iterator,
java.util.Enumeration, java.util.Map,
String, Object[] or array of primitive
types |
Yes |
Optional. The collection of values to
iterate over. If the value is null, no
iteration is performed. If not specified, the begin and
end attributes must be specified. |
var |
String |
No |
Optional. The name of the variable to
hold the value of the current element. |
varStatus |
String |
No |
Optional. The name of the variable to
hold a LoopTagStatus object. |
begin |
int |
Yes |
Optional. The first index,
0-based. |
end |
int |
Yes |
Optional. The last index,
0-based. |
step |
int |
Yes |
Optional. Index increment per
iteration. |
The <c:forEach> action is a powerful action that repeatedly
processes its body a number of times, as defined by its
attributes. In Example
8-2, only the items attribute is needed. The
items attribute accepts all standard Java collection
types, an array, or a string with a list of comma-separated
values. In other words, if a variable represents a collection
of values in some form, chances are <c:forEach>
can handle it. The var attribute specifies the name
of a variable to hold the current element of the collection.
The variable is available only within the body of the action
element.
The implicit paramValues variable is a collection of request
parameters sent to the page, with each parameter represented
by an array of values (rather than the single value per parameter held by
the param variable). Combining the
<c:forEach> action and the paramValues
variable makes it easy to loop through all submitted Favorite
Food choices and add each one to the response: Favorite Food:
<c:forEach items="${paramValues.food}" var="current">
<c:out value="${current}" />
</c:forEach>
The <c:forEach> action
iterates over the array values, and the nested
<c:out> action adds each value to the response.
If no choice was made (the EL expression doesn't return
anything), the <c:forEach> action simply does
nothing.
Besides the items and var
attributes used in Example
8-2, <c:forEach> also lets you define where
in the collection to start and stop the iteration
(begin and end) and if all or just some
elements should be processed (step). These attributes
can also be used without a collection to process the body a
fixed number of times: <c:forEach begin="1" end="4">
...
</forEach>
The varStatus attribute can be used
to name a variable that holds a bean with iteration status
details. You can use it when something needs to be done only
on the first or last pass through the body, or for even and
odd indexes, etc. The iteration status bean
(javax.servlet.jsp.jstl.core.LoopTagStatus) is
described in Appendix
B.
8.1.2 Accessing Other Request
Data
The param and paramValues
variables give you access to request parameters. But there's a
lot of information passed with a request besides parameters.
Header values can be accessed through the header and
headerValues variables, and cookies through
the cookie variable. Other request information is
available through the EL as properties of the object that
represents the request itself, accessed through the implicit
pageContext variable's request property. The
request
property is an instance of a class named
javax.servlet.http.HttpServletRequest, and Table
8-3 shows its properties for information that isn't
available through the other implicit objects (except a few
that aren't appropriate for use in a JSP page).
Table 8-3. Properties for
javax.servlet.http.HttpServletRequest
authType |
String |
Read |
The name of the authentication scheme
protecting the request |
characterEncoding |
String |
Read |
The request body character encoding, or
null if unknown |
contentLength |
int |
Read |
The request body length, or -1 if
unknown |
contentType |
String |
Read |
The request body MIME type |
contextPath |
String |
Read |
The context path for the
request |
cookies |
javax.servlet.http.Cookie[] |
Read |
The cookies received with the
request |
locale |
java.util.Locale |
Read |
The client's preferred locale |
locales |
java.util.Enumeration |
Read |
A list of all client locales in order
of preference |
method |
String |
Read |
The request method (e.g., GET,
POST). |
protocol |
String |
Read |
The protocol name and version, e.g.,
HTTP/1.1 |
remoteAddr |
String |
Read |
The client's IP address |
remoteHost |
String |
Read |
The client's hostname or IP address if
not known |
remoteUser |
String |
Read |
The username used to make the request
if the page is protected, otherwise null
|
requestURI |
String |
Read |
The request URI, e.g., /app/page.jsp |
requestURL |
StringBuffer |
Read |
The request URL, e.g., http://server/app/page.jsp |
scheme |
String |
Read |
The scheme, e.g., http or
https. |
servletPath |
String |
Read |
The context-relative path for the
request, e.g., /page.jsp.
|
serverName |
String |
Read |
The name of the server the request was
sent to |
serverPort |
int |
Read |
The port the request was sent
to |
secure |
boolean |
Read |
true if the request was made
over a secure channel (e.g., SSL). |
userPrincipal |
java.security.Principal |
Read |
The Principal representing the
user making the request if the page is protected,
otherwise null
|
Example
8-3 shows a page that displays some of the available
information.
Example 8-3. Request
information (reqinfo.jsp) <%@ page contentType="text/html" %>
<%@ taglib prefix="c" uri="http://java.sun.com/jstl/core" %>
<html>
<head>
<title>Request Info</title>
</head>
<body bgcolor="white">
The following information was received:
<ul>
<li>Request Method:
<c:out value="${pageContext.request.method}" />
<li>Request Protocol:
<c:out value="${pageContext.request.protocol}" />
<li>Context Path:
<c:out value="${pageContext.request.contextPath}" />
<li>Servlet Path:
<c:out value="${pageContext.request.servletPath}" />
<li>Request URI:
<c:out value="${pageContext.request.requestURI}" />
<li>Request URL:
<c:out value="${pageContext.request.requestURL}" />
<li>Server Name:
<c:out value="${pageContext.request.serverName}" />
<li>Server Port:
<c:out value="${pageContext.request.serverPort}" />
<li>Remote Address:
<c:out value="${pageContext.request.remoteAddr}" />
<li>Remote Host:
<c:out value="${pageContext.request.remoteHost}" />
<li>Secure:
<c:out value="${pageContext.request.secure}" />
<li>Cookies:<br>
<c:forEach items="${pageContext.request.cookies}" var="c">
<b><c:out value="${c.name}" /></b>:
<c:out value="${c.value}" /><br>
</c:forEach>
<li>Headers:<br>
<c:forEach items="${headerValues}" var="h">
<b><c:out value="${h.key}" /></b>:
<c:forEach items="${h.value}" var="value">
<br>
<c:out value="${value}" />
</c:forEach>
<br>
</c:forEach>
</ul>
</body>
</html>
The EL expressions used as
<c:out> value attribute values get
various request object properties.
Cookie values can be
accessed in two ways: through the implicit cookie
variable or through the request object's cookies
property. The first way is the easiest to use when you know
the name of the cookie you're looking for; I will show you an
example of this in Chapter
12. The second way is used in Example
8-3, since we don't know the cookie names and want to list
all of them. A <c:forEach> action loops over
all cookies received with the request and makes the current
cookie available through a variable named c within
its body. A class named javax.servlet.http.Cookie,
with the properties name and value,
represents a cookie. The nested <c:out> actions
add the value of these two properties for each cookie to the
response.
Header values can be
accessed through the implicit header and
headerValues variables. In Example
8-3, <c:forEach> actions loop over all
headers and then over all values for each header, adding the
names and the values to the response.
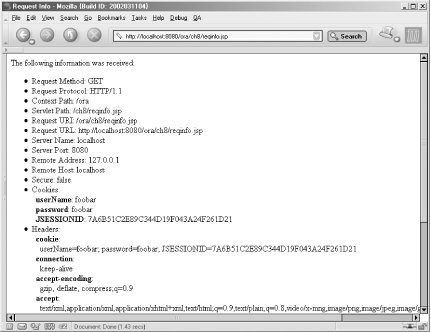
Figure
8-2 shows a typical response generated by the JSP page
in Example
8-3.
8.1.3 Capturing Parameter Values
Using a Bean
As you may remember from Chapter
6, a bean is often used as a container for data, created
by some server process and used in a JSP page to display the
data. But a bean can also be used to capture user input. The
captured data can then be processed by the bean itself, or
used as input to some other server component (e.g., a
component that stores the data in a database or picks an
appropriate banner ad to display).
To capture the user input from the example
form, I have implemented a bean named
com.ora.jsp.beans.userinfo.UserInfoBean, with the
properties described in Table
8-4.
Table 8-4. Properties for
com.ora.jsp.beans.userinfo.UserInfoBean
userName |
String |
Read-write |
The user's full name |
birthDate |
String |
Read-write |
The user's birth date in the format
yyyy-mm-dd (e.g., 2002-01-23)
|
emailAddr |
String |
Read-write |
The user's email address in the format
name@company.com |
gender |
String |
Read-write |
The user's gender (m or
f) |
luckyNumber |
String |
Read-write |
The user's lucky number (between 1 and
100) |
food |
String[] |
Read-write |
The user's favorite food (any
combination of z, p, and c)
|
As shown in the "Access" column in Table
8-4, all properties are read-write, meaning that, in
addition to using the bean's properties to generate output,
the property values can be set based on user input.
Example
8-4 shows the last part of a JSP page that uses the bean
to capture the user input and then displays the values using
JSTL actions. The part of the page that contains the form
isn't included in Example
8-4 because it's identical to the form part in Example
8-2.
Example 8-4. Capturing
parameters with a bean (input_bean.jsp) ...
<jsp:useBean id="userInfo"
class="com.ora.jsp.beans.userinfo.UserInfoBean">
<jsp:setProperty name="userInfo" property="*" />
</jsp:useBean>
You entered:<br>
Name: <c:out value="${userInfo.userName}" /><br>
Birth Date: <c:out value="${userInfo.birthDate}" /><br>
Email Address: <c:out value="${userInfo.emailAddr}" /><br>
Gender: <c:out value="${userInfo.gender}" /><br>
Lucky Number: <c:out value="${userInfo.luckyNumber}" /><br>
Favorite Food:
<c:forEach items="${userInfo.food}" var="current">
<c:out value="${current}" />
</c:forEach>
</body>
</html>
At the top of Example
8-4, a <jsp:useBean> action element creates
the bean and associates it with a name; the id
attribute specifies the name for the bean and the
class attribute specifies the fully qualified class
name. This is similar to how the action was used to create the
beans in Chapter
6, except that here the body contains a nested
<jsp:setProperty> action element. You must
therefore use both an opening tag and a closing tag
(</jsp:useBean>) instead of the empty element
shorthand notation (<jsp:useBean id="..." class="..."
/>) used in Chapter
6. The body of a <jsp:useBean> action
element is processed only when a new bean is created. In this
example, that's always the case, but as you'll learn in Chapter
10, there are times when the bean already exists, and the
action is needed only to associate the bean with a name.
Now let's take a closer look at the
<jsp:setProperty> action. In Chapter
6, this action sets a bean property to a static value,
such as the message category in the message-producing bean.
That's nice, but the real power of this action lies in its
ability to set bean properties from request parameter values.
This is how it's used in Example
8-4, enabled by the property attribute's asterisk
(*) value. If you compare the name attribute
values for all fields in the form with the
UserInfoBean property names in Table
8-4, you notice that each field name maps to a property
name. With property="*", the
<jsp:setProperty> action sets all bean
properties to the value of the corresponding parameters
automatically. For this to work, the field name must match the
property name exactly, including case. Since bean property
names always start with a lowercase letter, so must all the
field names. Getting the properties set automatically is
great; if you define more properties for your bean, all you
have to do to set them is add new matching fields in the form
that invokes the JSP page.
Besides the property and
value attributes you have seen so far, the
<jsp:setProperty> action supports one more
attribute: param. If you can't use the same name for
the parameters and the property names for some reason, you can
use the param attribute to set a bean property to the
value of any request parameter: <jsp:setProperty
name="userInfo"
property="userName"
param="someOtherParam"
/>
Here the userName property is set to
the value of a request parameter named
someOtherParam.
As in Example
8-2, <c:out> actions are used to add the
submitted values to the response. The only difference is that
in Example
8-4, the EL expressions pick up the values captured by the
bean instead of getting the parameter values. Name: <c:out value="${userInfo.userName}" /><br>
userInfo is the bean variable
created by the <jsp:useBean> action. The
property name (userName) is separated from the bean
variable name by a dot to tell the EL to get the property
value.
The Favorite Food choices are available
through a property named food as an array of strings.
It's processed with the <c:forEach> action,
just as in the JSTL example: Favorite Food:
<c:forEach items="${userInfo.food}" var="current">
<c:out value="${current}" />
</c:forEach>
|